FlowPanes and TilePanes are nice layout panes, if you want to layout your children consecutively one after another, either horizontally or vertically. They are quite similiar to each other as both will layout their children either in columns (in case of a horizontal Flow/TilePane) and wrap at their width or in rows (in case of a vertical Flow/TilePane) and wrap at their height.
The only major difference is, that the TilePane places all children in tiles that are the same size! So the size of the greatest children is taken for the size of each individual tile in the TilePane. Therefore a TilePane is also a nice way to size and align buttons and other controls equally. (See my previous post Sizing Buttons equally inside a VBox or HBox)
FlowPane and TilePane – Example 1
import java.util.Random;
import javafx.application.Application;
import javafx.geometry.Insets;
import javafx.scene.Scene;
import javafx.scene.control.Button;
import javafx.scene.effect.DropShadow;
import javafx.scene.image.Image;
import javafx.scene.image.ImageView;
import javafx.scene.layout.*;
import javafx.scene.paint.Color;
import javafx.scene.text.Font;
import javafx.scene.text.FontWeight;
import javafx.scene.text.Text;
import javafx.stage.Stage;

/**
 *
 * Created on: 24.03.2012
 * @author Sebastian Damm
 */
public class FlowPaneAndTilePaneExample extends Application
{
    private Random random;
    private VBox root;

    private FlowPane flowPane;
    private TilePane tilePane;

    @Override
    public void start(Stage primaryStage) throws Exception
    {
        random = new Random();
        root = new VBox(30);

        VBox upperVBox = createUpperVBox();
        VBox lowerVBox = createLowerVBox();

        fillPanesWithImages();

        root.getChildren().addAll(upperVBox, lowerVBox);

        Scene scene = new Scene(root, 800, 600, Color.ANTIQUEWHITE);

        primaryStage.setTitle("FlowPane and TilePane Example");
        primaryStage.setScene(scene);
        primaryStage.show();
    }

    private VBox createUpperVBox()
    {
        VBox vbox = new VBox(20);

        Text textFlowPane = new Text("I am a FlowPane");
        textFlowPane.setFont(Font.font("Calibri", FontWeight.BOLD, 30));
        textFlowPane.setUnderline(true);
        textFlowPane.setEffect(new DropShadow());
        VBox.setMargin(textFlowPane, new Insets(10, 0, 0, 10));

        flowPane = new FlowPane();
        flowPane.setHgap(5);
        flowPane.setVgap(5);

        vbox.getChildren().addAll(textFlowPane, flowPane);
        VBox.setMargin(vbox, new Insets(10));

        return vbox;
    }

    private VBox createLowerVBox()
    {
        VBox vbox = new VBox(20);

        Text textTilePane = new Text("I am a TilePane");
        textTilePane.setFont(Font.font("Calibri", FontWeight.BOLD, 30));
        textTilePane.setUnderline(true);
        textTilePane.setEffect(new DropShadow());
        VBox.setMargin(textTilePane, new Insets(10, 0, 0, 10));

        tilePane = new TilePane();
        tilePane.setHgap(5);
        tilePane.setVgap(5);

        vbox.getChildren().addAll(textTilePane, tilePane);
        VBox.setMargin(vbox, new Insets(10));

        return vbox;
    }

    private void fillPanesWithImages()
    {
        for (int i = 1; i <= 6; i++)
        {
            int imgSize = random.nextInt(128) + 1;

            Button bt = new Button();
            Image img = new Image(FlowPaneAndTilePaneExample.class
   .getResourceAsStream("images/person" + i + ".png"),
   imgSize > 50 ? imgSize : 50, 0, true, false);
            ImageView view = new ImageView(img);
            bt.setGraphic(view);

            flowPane.getChildren().add(bt);

            Button bt2 = new Button();
            Image img2 = new Image(FlowPaneAndTilePaneExample.class
   .getResourceAsStream("images/person" + i + ".png")
   , imgSize > 50 ? imgSize : 50, 0, true, false);
            ImageView view2 = new ImageView(img2);
            bt2.setGraphic(view2);

            tilePane.getChildren().add(bt2);
        }
    }

    public static void main(String[] args)
    {
        Application.launch(args);
    }
}
This little application shows the major difference between a FlowPane and a TilePane by putting the same content in both panes. The both panes will be put in another VBox with an additional Text on top.
I am assuming that only the parts of the code with the FlowPane, the TilePane and the image loading are new to you by now. If you have problems understanding this JavaFX code please see my previous examples where I started with the basics of JavaFX 2.0.
Both panes provide amongst others a setHgap and a setVgap method to declare a spacing between each column and each row. To fill the buttons I chose to load some images.
In JavaFX 2.0 images can be shown with a ImageView which expects an Image object. (Note: This is an javafx.scene.image.Image, not an java.awt.image!)
Such an ImageView can then by applied to any Labeled object. Labeled is a subclass of Control and amongst others the abstract parent class of Label and ButtonBase (which is the base class for every kind of button), which allows you to set an image to every kind of label and button.
My six buttons are all 128x128 pixels. To show you the difference between a FlowPane and a TilePane I chose to resize these images. At the moment this is only possible directly in the constructor of the Image class as there are no methods to change the size of an Image object later on. One constructor takes an InputStream, two double values for the width and the height and two boolean values for preserving the aspect ratio of the image and for the ‘smooth’ property. If you want to resize your image and keep the aspect ratio you can just specify either the width or the height and keep the ratio by passing ‘true’ as the first boolean value. With the ‘smooth’ property you can choose between a clearer or a faster rendering of the image.
Depending on the random value generated for the size, your application should look something like this:
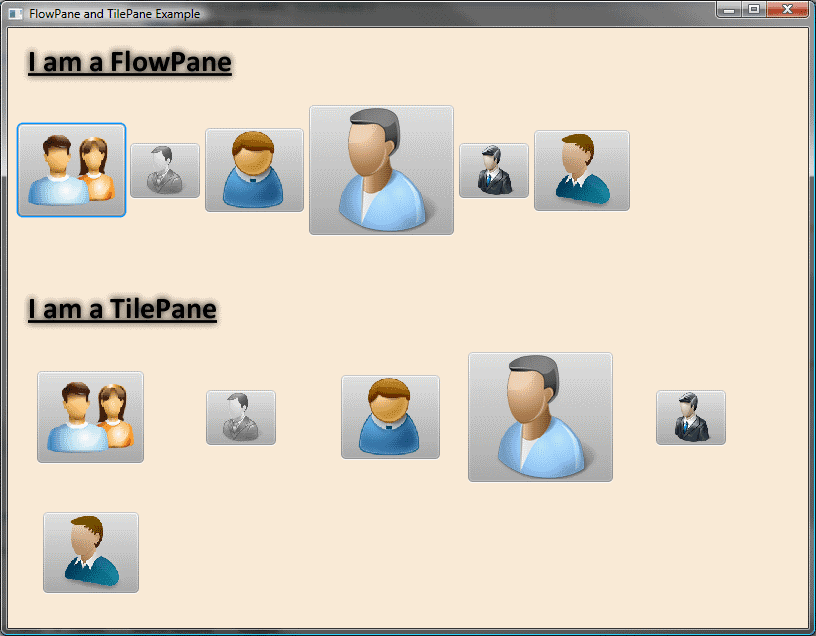
You can see that the images are basically the same. The difference is, that the FlowPane lays out all images directly after another only separated by the gap specified with the setHgap method, whereas the TilePane put all images in tiles of the same size.
FlowPane and TilePane – Example 2
Here is another small example: As stated in the introduction of this post, a TilePane is also a very nice way for sizing and aligning buttons equally. To show the main difference between a FlowPane and a TilePane another time, the same elements will be put in both panes again.
Here is the code:
import javafx.application.Application;
import javafx.geometry.Insets;
import javafx.geometry.Orientation;
import javafx.geometry.Pos;
import javafx.scene.Scene;
import javafx.scene.control.Button;
import javafx.scene.control.Separator;
import javafx.scene.layout.*;
import javafx.scene.paint.Color;
import javafx.scene.paint.CycleMethod;
import javafx.scene.paint.RadialGradient;
import javafx.scene.paint.RadialGradientBuilder;
import javafx.scene.paint.Stop;
import javafx.scene.text.Font;
import javafx.stage.Stage;

/**
 *
 * Created on: 24.03.2012
 * @author Sebastian Damm
 */
public class FlowPaneAndTilePaneExample2 extends Application
{
    private VBox root;

    private FlowPane flowPane;
    private TilePane tilePane;

    @Override
    public void start(Stage primaryStage) throws Exception
    {
        root = new VBox();
        root.setAlignment(Pos.CENTER);

        initFlowPane();
        initTilePane();
        createButtons();

        root.getChildren().addAll(flowPane, new Separator(), tilePane);

        Scene scene = new Scene(root, 400, 300);
        RadialGradient background = RadialGradientBuilder.create()
                .stops(new Stop(0d, Color.web("#fff"))
                    , new Stop(0.47, Color.web("#cbebff"))
                    , new Stop(1d, Color.web("#a1dbff"))
                )
                .cycleMethod(CycleMethod.NO_CYCLE)
                .build();
        scene.setFill(background);

        primaryStage.setTitle("FlowPane and TilePane Example 2");
        primaryStage.setScene(scene);
        primaryStage.show();
    }

    private void initFlowPane()
    {
        flowPane = new FlowPane(Orientation.VERTICAL);
        flowPane.setHgap(5);
        flowPane.setVgap(5);
        flowPane.setPrefHeight(200);
        flowPane.setAlignment(Pos.CENTER);
        VBox.setMargin(flowPane, new Insets(10));
    }

    private void initTilePane()
    {
        tilePane = new TilePane(Orientation.VERTICAL);
        tilePane.setHgap(5);
        tilePane.setVgap(5);
        tilePane.setPrefHeight(200);
        tilePane.setAlignment(Pos.CENTER);
        VBox.setMargin(tilePane, new Insets(10));
    }

    private void createButtons()
    {
        Button bt = new Button("1");
        bt.setMaxWidth(Double.MAX_VALUE);
        bt.setMaxHeight(Double.MAX_VALUE);
        Button bt2 = new Button("Button 1");
        bt2.setMaxWidth(Double.MAX_VALUE);
        bt2.setMaxHeight(Double.MAX_VALUE);
        Button bt3 = new Button("Button");
        bt3.setMaxWidth(Double.MAX_VALUE);
        bt3.setMaxHeight(Double.MAX_VALUE);
        bt3.setFont(Font.font("Cambria", 22));

        Button bt4 = new Button("1");
        bt4.setMaxWidth(Double.MAX_VALUE);
        bt4.setMaxHeight(Double.MAX_VALUE);
        Button bt5 = new Button("Button 1");
        bt5.setMaxWidth(Double.MAX_VALUE);
        bt5.setMaxHeight(Double.MAX_VALUE);
        Button bt6 = new Button("Button");
        bt6.setMaxWidth(Double.MAX_VALUE);
        bt6.setMaxHeight(Double.MAX_VALUE);
        bt6.setFont(Font.font("Helvetica", 22));

        flowPane.getChildren().addAll(bt, bt2, bt3);
        tilePane.getChildren().addAll(bt4, bt5, bt6);
    }

    public static void main(String[] args)
    {
        Application.launch(args);
    }
}
Again the root node is a VBox with a FlowPane in the upper region and a TilePane in the lower region. There are some parts in the code that may be new to you. First of all take a look at the lines 44-51. Here I create a radial gradient for the background of the scene with help from one of the numerous builder classes in JavaFX 2.0. I will cover gradients and also the builder pattern in own posts later on, so I won´t explain much here. For now you just need to know, that these lines create a radial background which is then applied to the scene via scene´s setFill method. (Like in previous examples we could have specified the background fill directly in the constructor of the scene, because it expects a Paint object, which includes not only normal colors, but also every kind of gradient).
In contrast to the first example, this time we use vertical panes which are populated with buttons. Because I want to allow the buttons to grow to whatever space is provided by their parent, I set the max height as well as the max width of every button to the constant Double.MAX_VALUE. (Take a look at my previous example Sizing Buttons equally inside a VBox or HBox if you haven´t already)
Your application should look like this:

As you can see in both panes the buttons grow to the width of their parent, but only in the TilePane the buttons also grow vertically because each tile in a TilePane is equally sized. This example may not seem very important but in the applications I developed in JavaFX 2.0 until now, I always wanted to size and align buttons equally because it is a subtle aspect that makes your application look more clean and polished.
If you resize you window, it should look like this:

Take a note, that once the buttons are not layed out vertically anymore in the FlowPane the buttons only occupy the space they need (based on their content) whereas in the TilePane all buttons are still of equal size.
hi
ReplyDeletei hve tried to run FlowPane and TilePane – Example 2 code on my eclipse IDE it shows this exception
"""" Exception in Application start method
Exception in thread "main" java.lang.RuntimeException: Exception in Application start method
at com.sun.javafx.application.LauncherImpl.launchApplication1(LauncherImpl.java:403)
at com.sun.javafx.application.LauncherImpl.access$000(LauncherImpl.java:47)
at com.sun.javafx.application.LauncherImpl$1.run(LauncherImpl.java:115)
at java.lang.Thread.run(Unknown Source)
Caused by: java.lang.NullPointerException: Input stream must not be null
at javafx.scene.image.Image.validateInputStream(Image.java:997)
at javafx.scene.image.Image.(Image.java:644)
at oracle.javafx.FlowPaneAndTilePaneExample.fillPanesWithImages(FlowPaneAndTilePaneExample.java:97)
at oracle.javafx.FlowPaneAndTilePaneExample.start(FlowPaneAndTilePaneExample.java:39)
at com.sun.javafx.application.LauncherImpl$5.run(LauncherImpl.java:319)
at com.sun.javafx.application.PlatformImpl$5.run(PlatformImpl.java:206)
at com.sun.javafx.application.PlatformImpl$4.run(PlatformImpl.java:173)
at com.sun.glass.ui.win.WinApplication._runLoop(Native Method)
at com.sun.glass.ui.win.WinApplication.access$100(WinApplication.java:29)
at com.sun.glass.ui.win.WinApplication$3$1.run(WinApplication.java:73)
... 1 more
"""""
Hi, what version of Java and JavaFX have you installed on your system?
Deletejre 7
Deleteonly jre7 another examples are running except FlowPane and TilePane – Example 2
DeleteSorry for the late answer, i´ve been very busy the last few weeks.
DeleteDue to your stack trace i think that the error occurs because you don´t have those comic pictures that i used for the buttons.
Therefore the input stream is null when you try to load those images.